Product Development Journey - TiledFlexi Keys: Part 1
The product development journey to build an end to end electronic product
TL;DR
Part one of journey to build a modular macropad. This week include initial design concept, some design decisions and peek into various toolchain selection and experiences.
The Inspiration
For last couple of months, I’ve been meaning to start a product development exercise where I start from scratch and develop a design process and workflows for all aspects on product development. The workflow and process needs to encompass all the stages right from concept design to manufacturing and deployment. Further, it needs to encompass all horizontals for the product development as well, including electronics, firmware, mechanical and software along with operations.
Thanks for reading Rishabh’s Substack! Subscribe for free to receive new posts and support my work.
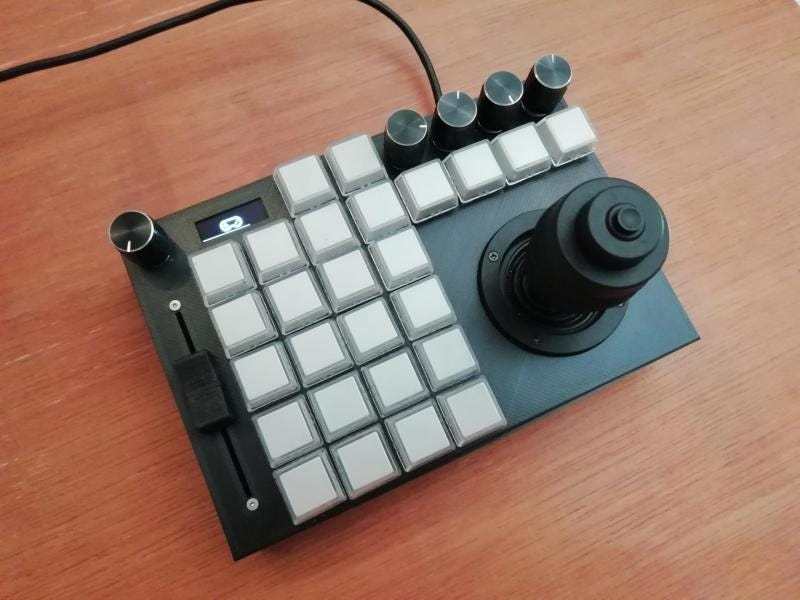
Looking for the project to start, I had different ideas and finally decided to make a macropad as first project in this series. I had started this project a while back and then parked it due to constraint on time. I decided to restart the project from scratch after coming across an amazing project by Salim Benbouziyane - ocreeb-mk2. There are multiple awesome commercially available products available with same concept as well like modue but the idea was to build something from scratch going through all the hoops and loops of the development process. Another idea was to explore various and get exposure to a variety of tools instead of sticking with just something I’m already familiar with.
The Product
The concept of macropad is having a custom input device for your computer which assists your workflow while working with various software tools. Visualize working on microsoft word and being able to switch to regularly used text type like heading, bold, highlight with a single button without having to navigate the toolbar and then selecting button individually; or working on photoshop and having physical knobs on your desk to adjust RGB individually; or working on CAD software and using various keys to change the tools.
Something like link

System Requirements
Another process I wanted to fix with this project was documentation. I decided to use Notion for maintaining the notebook. Loved the interface, if I ever move to my own server, I might use outline. Proceeding to defining system level requirements and introducing constraints on designs.
Again, taking inspiration from ocreeb-mk2 for many of these requirements and then adding few additional requirements and changing some, spanning across domains, let me list them down.
- Grid and modular inputs - I wanted the product to be modular in grid pattern where user can add or remove module as per his product requirement. The module needs to snap to neighboring modules using magnets and communicate with pogo interface on the side.
- Mappable Inputs - The inputs needs to be mappable to various software either in foreground or background.
- PC Interface - PC interface needs to be both USB C and Bluetooth.
- Modules - Various inputs including keys, knobs, rotors, sliders, joystick and being able to have future expandability.
Taking these into consideration, I went into detail designs. Before moving to detail design, let’s take a list of software tool I’ll be using first.
Tools
Electronics CAD
For Electronics CAD, exploring the options there were multiple aspects to choose from. Should I go with professional tools like Altium, Allegro? How about open source tool like KiCad? How about upcoming cloud based tools like Flux.io? Taking them into account, Altium and Allegro were too costly for a simple project like this. I did like Flux.io and started designing there first, but soon I realized that the tool was buggy since they’re in beta at the moment and continuously evolving. Although I agree with the design specially for maker projects like these, but not wanting to deal with bugs at the moment, I finally decided to move to KiCad.
KiCad, had most of the features needed for my development including hierarchical sheets, BoM generation, PCB design, 3D CAD export. Plus being open source, there are tons of resources, plugins and symbol library to use for almost any part.
Talking about plugins and libraries, some of the plugins I found super useful are Kikit, Interactive PCB BoM and some plugins for arrangement of items on PCB and Schematic editor. Most of the symbol, footprint and 3D model library can be found at snapeda.
For version control, currently I’m just using github. There are tools for visual diff like kiri which I’d like to explore. Another tool to explore would be cadlab.io for cloud based visual diffs.
Mechanical CAD
For mechanical CAD, the 3 options to consider were onshape, Fusion 360 and freecad. I found Fusion 360 very user friendly to use. FreeCAD had a resistance and UI was to enter into the same and Onshape’s opening up the design in free version didn’t appeal to me since I wanted to experiment with lot of stuff.
After designing a version of enclosure, I realized that I’ll have the repeat the template for all modules and I found that Fusion 360 has API worth exploring. I’ll get into details of the API with pros and cons in another article.
Firmware
A design decision I took for the project was to select a controller for separate family for each module. The reason behind this was that one of the idea in the project is to explore various tools and environments so why not take the opportunity to get acquainted to different IDEs and microcontrollers and see how far I can go with each.
Some of the families I selected were, ESP32-S3, STM32F103, PIC18L433, ATtiny841, RP2040, CH32V003. This would give me exposure to various IDEs although at the trade off of project timeline.
It’s not finalized which toolchain and IDEs I’m going to be using at the moment and I’ll update the topic once I enter into that part of the project.
Software
I’m yet to decide of the software stack I’m going to be using at the moment. Personally I’m comfortable with Python and Javascript platforms but for this I’d like to use Flutter as front end and Python for parts of integration. This might change completely as at this moment I’ve not started working on software.
Some inspiration for the software can be found from software of modue. Although I’ll start with tools integration which are niche and relevant to me like KiCad, Fusion 360, VS Code, IDE etc.
Documentation
For documentation, I decided to go with notion and then move to outline in future if I decide to self host a similar app. For now, notion works great with hierarchical structure, clean design, embeds and couple of additional tools I love. I’ve started noting requirements, design calculations, links and resources in notion. Another thing to track would be timespent to get better estimates for such project in future. Plus this series of articles will act as go to guide for future. I’m looking for specialized tool to create QC checklists and manufacturing pipeline when I move to that part of project.
What’s Next?
In the next part, I plan to explore the schematic for the complete design. At the moment, since I’m starting this article series when I’ve already completed 30% of the project, I’ve enough content for 2 more parts which I need to catch up to which I’ll release each weekend for next 2 weeks. After that, the plan is to have article biweekly to update on the progress.
Thanks for reading Rishabh’s Substack! Subscribe for free to receive new posts and support my work.